Scaffolding Mallet Instruction in Elementary General Music
In this post we looked at one of the best ways to enhance a piece in an elementary general music room - adding a bordun.
From a pedagogy standpoint, a bordun often one of the earlier partwork skills students explore in our classrooms so it plays an important part in our move toward interdependent musicianship.
Even though borduns are valuable, it can be tricky to know how to introduce them so students have success. Especially if mallet work is new to students, there can be a fear that it will devolve into chaos.
Today we’ll look at how to scaffold instruction so students are set up for success when they sit down behind an instrument. We’ll talk about these steps in the context of a bordun, but they apply to other mallet parts as well!
In This Post:
In this post we’ll explore…
Three Sample 3rd Grade Lessons
Different options to consider, depending on what your students need
General Tips for Teaching Borduns
Tried-and-true things to keep in mind
Teacher Prep for Teaching Borduns
So you can focus on what students need from you.

I - Sample Lesson Processes for 3rd Grade
These lesson processes use the song, Alabama Gal.
Option 1: Straightforward, teacher-directed, by rote
Option 2: Intermediate (several years of previous bordun and partwork experience)
Option 3: Beginners (with minimal or no bordun and partwork experience)

Sample Teaching Process 1:
3rd Grade Straightforward
This process moves students to the instruments and gets them playing as quickly as possible!
LESSON 1:
5 minutes
With students at barred instruments, the teacher says, “Please play this on your biggest F and smallest C.” T leads students in playing the bordun, “will you be my friend”
The teacher asks a small group of students to stay at the instruments. The rest of the students move to sing and play the game to Alabama Gal.
That’s it!
There are times this option - simple, straightforward, imitative - can be practical to use. Perhaps we simply need to move the musical ensemble along as we prep for a performance or other sharing. Perhaps the purpose of the lesson segment isn’t partwork, melody, or harmony, but some other musical concept and so we want to move toward the real purpose of the activity. There are times the most direct way is the best way.
However, before using this option exclusively in all lessons, there may be questions to explore.
Is this a process that will work for all students? Is there a way to build in opportunities for students to use their musical knowledge? Are there opportunities for group work or other collaborations? Are there ways to move from imitation and toward using the bordun to develop deeper levels of ensemble skills and musical understandings? Is there a way to add more artistry and musicianship to the teaching process?
Let’s explore those questions with the second process sample.
Sample Teaching Process 2:
3rd Grade Intermediate
This is one example of a process that could be used with 3rd graders who have plenty of previous experience with borduns and partwork.
LESSON 1:
15 minutes
Play the game and sing Alabama Gal while the teacher plays the bordun pattern
The teacher leads the class speaking / patting the text: “Will you be my friend” and speaking on rhythm syllables “ta-a, ta-a, ta ta ta”
Students sing Alabama Gal and simultaneously pat the bordun rhythm on their knees. The teacher observes students as an assessment. Students show their self-assessment of their performance on their fingers.
The teacher asks, “If our bordun is on do and sol, and do is F, where is sol?” (c) “If do is the bottom pitch on the instrument, which hand would play it?” (left)
Students speak the pattern as they move to barred instruments (2 students per instrument). The teacher invites students to play the rhythm of the bordun on any combination of do and sol they prefer. Take answers as time allows.
The teacher chooses six students to stay on instruments and play the chord bordun while the class plays the game to Alabama Gal. After a round of the game, the six students hand their mallets to another set of six students. The previous instrument players play the game. Repeat as time allows, switching out who plays the bordun.
This sample process calls on students to use conscious rhythmic and melodic vocabulary. Students self-assess their performance. The process highlights musical thinking and ensemble skills. Students have an invitation to explore divergent thinking before playing the teacher-created pattern.
However, we might still have some questions to consider before using this model exclusively.
What if students don’t accurately speak and pat the pattern in the second step? What if they aren’t ready to simultaneously sing and pat the bordun in step 3? What if they’ve never tried a bordun before?
We can take some steps to scaffold the process so students have more opportunities for success or positive redirection in each step.
Sample Teaching Process 3:
3rd Grade Beginners
This is one example of a process that could be used with 3rd graders who have minimal or no partwork and bordun experience. Instead of going to instruments right away, we’ll divide the process over three short lesson segments.
LESSON 1:
4 minutes
Students play the game and sing the song while the teacher plays the bordun
Seated, students sing and pat the steady beat. The teacher observes the steady beat and singing performance as an assessment. Students show their self-assessment of their performance on their fingers.
LESSON 2:
12 minutes
Students play the game and sing Alabama Gal while the teacher plays the bordun
Seated in two lines from the game, the teacher leads the class speaking / patting the text: “Will you be my friend” and speaking on rhythm syllables “ta-a, ta-a, ta ta ta”
Half the class speaks and pats the text of the bordun, half sings Alabama Gal. Switch jobs. The teacher observes students perform as an assessment.
Students show which job is their favorite by holding up one finger for the text of the bordun and two fingers for Alabama Gal. Students perform their favorite part. The teacher observes students perform as an assessment
At barred instruments with a partner (two students per instrument), tell students the pattern is going to be played on do and sol. Do will be the lowest F. Challenge students to find sol. Partners work together to figure out the pitches on the instrument.
The teacher asks questions to help guide thinking as necessary:
If do is F, where is sol? (c)
If do is the lowest note, which hand is playing it? (left)
The teacher invites students to play the rhythm of the bordun on any combination of do and sol they prefer. Then, establish the chord bordun pattern. Each partner takes a turn playing “will you be my friend” on F and C.
LESSON 3:
10 minutes
Play the game and sing Alabama Gal
Review the bordun text (will you be my friend) and where the bordun is played on the instrument (F and C)
A small group of students plays the bordun on barred instruments while the rest of the class plays the game to Alabama Gal
After the game, the mallet players bring their mallets to a classmate and a new group plays the bordun while the rest of the class sings and plays Alabama Gal. Switch jobs so everyone has a turn at an instrument
In addition to mallet performance, this process is designed to solidify partwork skills before students go to the instruments. This teaching process also calls on students to use previously learned musical knowledge and skills, and apply them to the brand new task of playing a bordun.
At the end of the process students have played the bordun, but they’ve also sung a song, played a game, aurally identified rhythm syllables, analyzed solfege, explored barred instrument, worked with partners, worked in small groups, and practiced partwork. Each step contributes to developing a layered picture of musicianship.
Each lesson process above meets the objective of students playing a chord bordun on barred instruments.
However, the process the teacher takes to get students to that point can be quite different.
None of these lesson processes is superior to the others. The choices we make in scaffolding a mallet part will depend on our students’ unique needs and the specific moment in time.
II - Tips for Teaching Borduns

Whether students are already familiar with borduns, or this is their first time trying them, there are some scaffolds we can put in place to give support to students who need it.
We can also use the steps to add more artistry and creativity to our teaching process!
A quick note.
You don’t necessarily need to use every single one of these steps every single time you want to teach a bordun. At some point, students have familiarity with the patterns and they need fewer support steps!
However, these steps can be incredibly helpful if mallet work is new to you or your students. And, if something goes south during the lesson, you’ll be better equipped to pinpoint what went wrong and make a strategy for how to course correct for next time.
I also believe these steps can serve to make the teaching process more artistic and bring in other areas of musical exploration.
Every Student Learns Every Part
In the final version of a song arrangement, it’s likely that only one or two students will play the bordun. However, students will have the most success musically and socially if every student learns the bordun part.
The barred instruments are not for the strongest players exclusively. All students get a chance to explore their skills through a bordun.
When all students know all the parts of the ensemble, it also helps listening and partwork skills!
The Body is the First Instrument
Even if your drone is just a steady beat, using body percussion or finding some movement connection before students go to the instruments will set students up for success.
The specific process you use will depend on the type of bordun you’re prepping.
Prepping a Chord Bordun
If you’re preparing a chord drone, you might have students pat their knees while singing the song. This is the scaffold we used in the sample 3rd grade lessons above.
If you look around the room and observe that students sing and play the bordun pattern simultaneously, that’s an indication that they’ll have success on barred instruments. If you look around the room and see that students don’t maintain the pattern as they sing, that’s a good indication that moving to barred instruments is likely to be chaotic.
Prepping a Broken Bordun
If you’re preparing a broken bordun, you can have students take turns patting their knees (“walking”) while singing the song.
The key here is that the tonic will be in their left hand. Understandably, most students tend to start walking their hands with their right hand.
If you look around the room and see students reverting back to right hand lead, that’s a sign that they might have trouble when they get to the barred instruments.
Prepping a Level Bordun
Level drones on a single instrument can be prepped by patting knees, and then floating hands over to the right to pat the floor.
Again, the right and left distinctions will be important here. We can observe students play their part while singing the song to get a sense of their partwork development.
Prepping an Arpeggiated Bordun
The favorite for a lot of upper elementary students is the arpeggiated bordun. We can prep that by crossing over to the floor while we sing the song.
Students will pat their left knee with their left hand, right knee with their right hand, cross the left hand over the right to play the floor, then pat the right hand on the right knee again. Again, if you see students singing the song while they perform the bordun pattern, that’s a sign they’re ready to move to instruments.
If you notice students getting mixed up about when to cross, that’s an indication that students will be more successful on barred instruments if you let them practice off instruments first. If students need a scaffold, it’s helpful to notice that the right hand never moves in this arpeggiated bordun. Try only floating the left hand from the left knee and across to the floor on the right, as if playing a passing game.
Start with Speech
If the bordun has a rhythm - a pattern of long and short sounds - it can be helpful to use a phrase for students to mentally hold onto as they play.
An especially common phrase is “will you be my friend.”
Practice Partwork Before Moving to Instruments
Especially if this kind of harmonic partwork is new to you and your students, it’s a great idea to practice the musical independence challenge of adding a bordun.
If we were to use the simple bordun pattern of “will you be my friend” you might have half the class speak the bordun text and half the class sing the song, then switch jobs so students are doing the opposite.
The smaller you make the groups, or the more distance you have between groups, the more partwork independence practice students will get.
III - Teacher Preparation for Teaching Borduns
There are some things we can do before ever stepping foot in the classroom to help students with mallet performance and partwork.
Barred Instrument Visuals
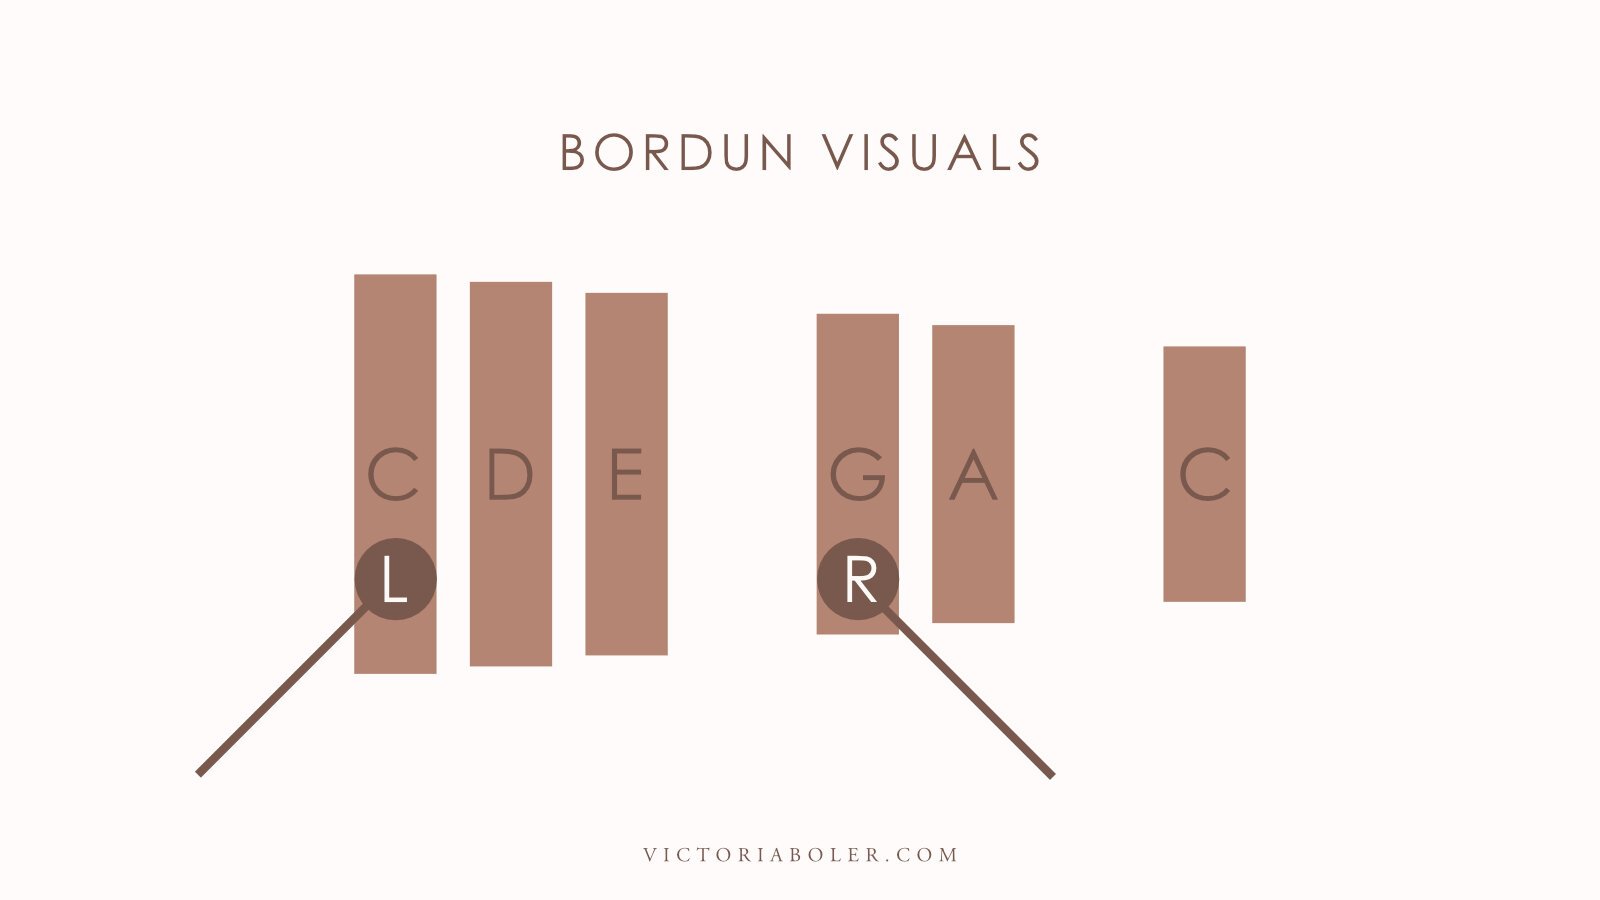
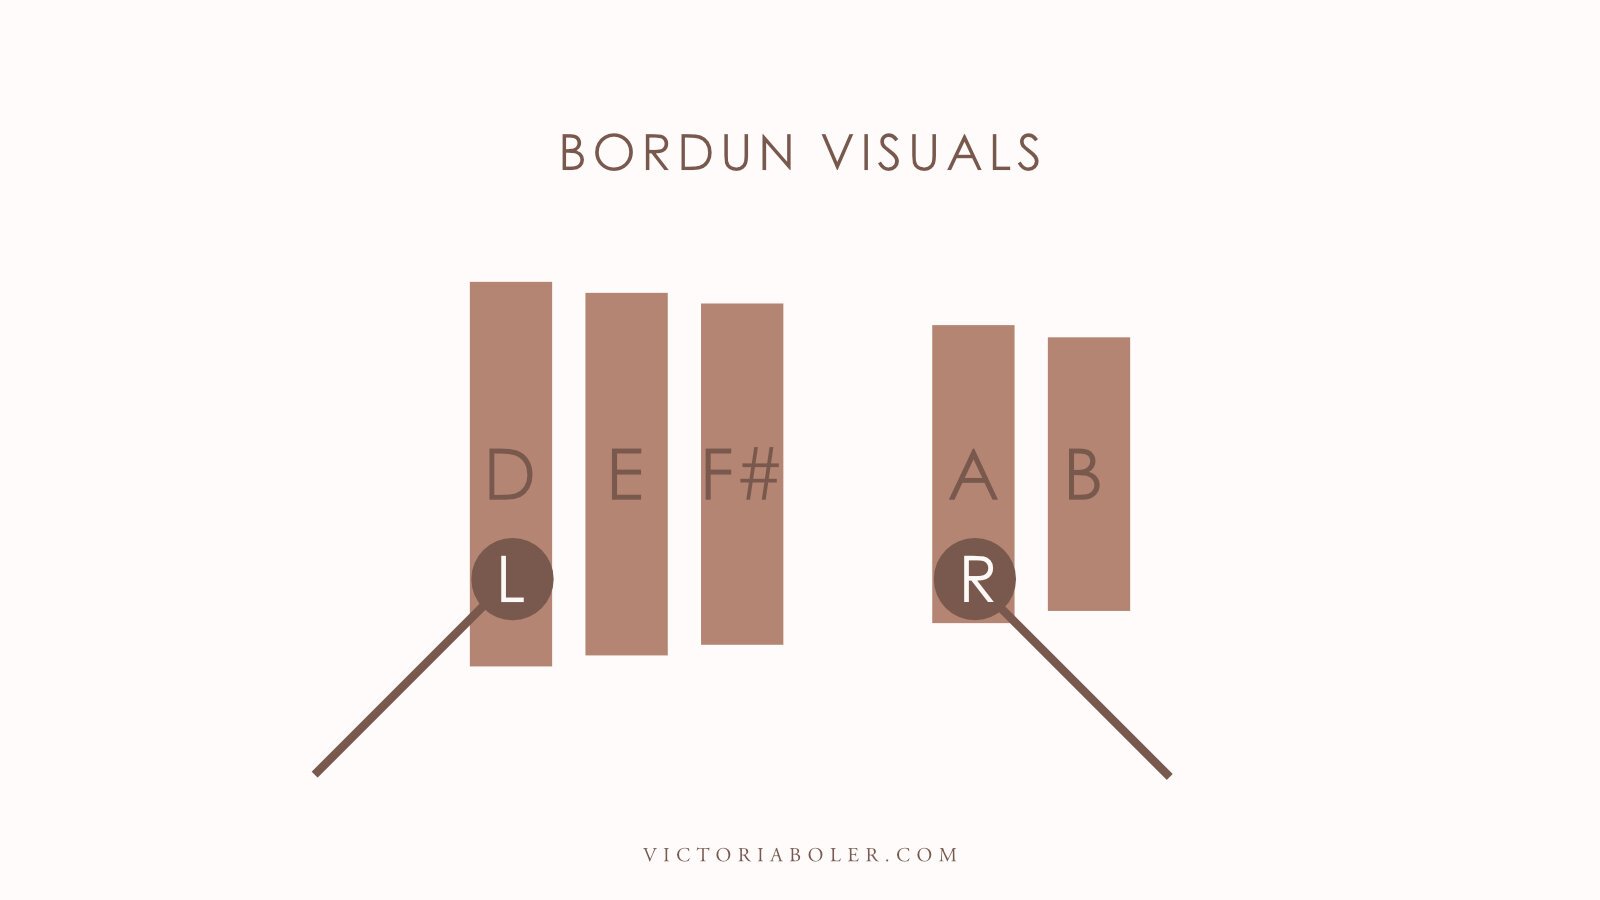
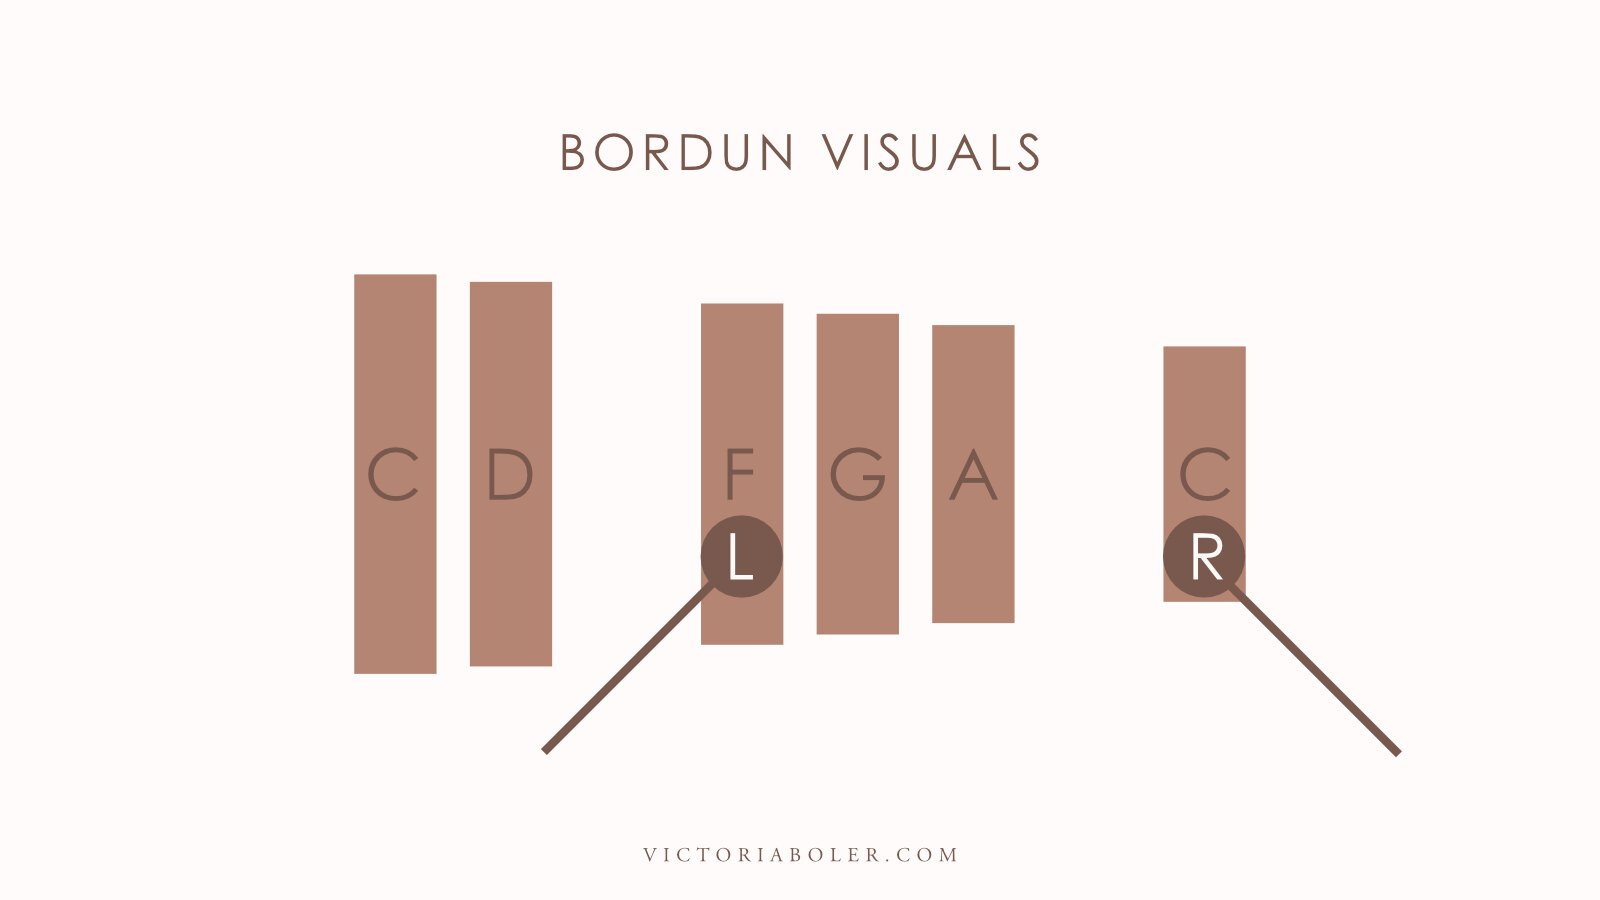
When it’s time to actually move to the instruments, there are some visual cues that we can give to help students.
If you model the bordun on an instrument, turn the instrument around so the low side of the instrument is on students’ left and the high side is on their right. This means you’ll play the bordun starting on your right hand instead of your left. This simple step makes such a difference in how students spatially perceive our instructions since students’ mallets will move the same direction as the teacher’s.
If you’re short on instruments, you can also display the keyboard layout on the board or on the wall. When it’s time to model, you’ll turn to the wall and mime playing the part as students follow along.
Eyes Up!
If you can’t see the students, you don’t know what’s going on musically or from a behavior standpoint. Practice singing the song and playing the bordun simultaneously while keeping your eyes up, instead of looking down at the instrument.
You can also practice speaking cues like you would in class, such as “Oh, I see someone bouncing their mallets!” or “Do you think our steady beat is speeding up or slowing down?”
Work on these skills ahead of time so you don’t look down at the instrument as you model playing the bordun. You can glance down when you need to as you play, but over time you’ll find that peripheral vision takes care of a lot!
In This Post:
In this post we’ve taken a detailed look at how to scaffold mallet instruction for elementary musicians.
We’ve talked through three sample 3rd grade lessons with different options to consider, depending on what your students need.
We’ve looked at general tips for teaching borduns like having every student learn the part, starting with speech, and using the body before moving to instruments.
We’ve also discussed ways to be prepared as the teacher, so we can focus on the students and what they need from us.